Contents
 Using the App
Once the app is installed you can use it to play music with other players over the internet. Before you can play in a session, one of the players need to start the session so that the other players can join in:
- Click on 'start' (you need a paid version to start a session)
- Send the session code to the other players
- The other players click on 'join' and enter the code
- You're done!
On your mixer panel (see below) you will see the names of other players who are currently in the session. As more members join, you will see their names appear on the mixer panel, and is the connection is made the status LED will change to green. That's all there is to it: now you can start playing and enjoying yourself!
The Main Window
When the app starts it displays the main window, and this will be what you see most of the time that you are using Solocontutti app. The following section explains the various controls and elements on this window. Note that for most of the options described below there are keyboard shortcuts which are described in the section on using a screen reader.
Menu options
Menu options
The following options are available from the menu:
Main
the main menu contains the most important options- "Preferences" opens the settings window which allows you to set up and modify various parameters. On the Mac this is not only on the main menu, but on the Solocontutti menu according to Mac standards. See below for description of the settings options.
- "Backing Track" add a backing track to play in the session. This will also be recorded as part of the session.
- "Jam" call up the list of available jam sessions (sessions open to anyone) and optionally create a new jam session (see below). NOTE: this option has been temporarily removed until some security concerns have been adressed
- "Chat" button allows you to open the chat window and converse with other users in the session. Chat messages that you enter are broadcast to all other users in the session. This function is provided for users that do not have a microphone to communicate with each other.
- "Wizard" will rerun the setup wizard that was run the first time that the app was installed.
- "Upgrade" gives you access to in-app purchases to upgrade the app.
- "Redeem" allows you to redeem a promotional code for the app
View
the view menu allows you change the look of the app- "Advanced" when enabled this includes all available options on the screen. Initially this is not enabled so that screen is less complex for beginning users. Enable this to access all available functions, depending in which tier of the app you have.
- "Background"this allows you to change the background and general theme of the display. There is a light, dark and high contrast theme as well as a few slightly silly options.
- "Next Tip" show the next tip in the tip of the day list
Tools
several tool are available to diagnose problems and tune the app- "Console"the console gives access to a wide range of tuning commands and diagnostic information. For more information on the console see the console guide
- "Tuning" this allows tuning of the link between you and one of the other players in the session. It displays several graphs of the performance of the link and allows you to modify parameters to improve the link quality
- "Reflect" run the audio reflector utility to test that communication and encoding is working (see below).
- "Test Signal" this allows you to send either a sine wave or play a file to all other participants in order to test the line is working. This is useful because it does not require your inputs to be correctly working to test the connection.
- "Reflect" run the audio reflector utility to test that communication and encoding is working (see below).
Help
- "About" show the general information, including version
- "Keyboard Shortcuts" show the keyboard shortcuts
- "Show Tips" when set this shows a new tip every time you start the app.
- "Check for New Version" contact the server to see if a new version is availale
- "Report Problem" report a problem to the app developer. This will start a sequence of gathering diagnostic information and sending it to the user. If you have a problem with an open session, keep the session open while you use the problem reporter
- "Quickstart" open the quickstart manual on the website
- "Online User Guide" open the full manual on the website
- "Onliune Help Videos" this opens the Youtube channel with help videos for the app
Main Screen
Main Screen
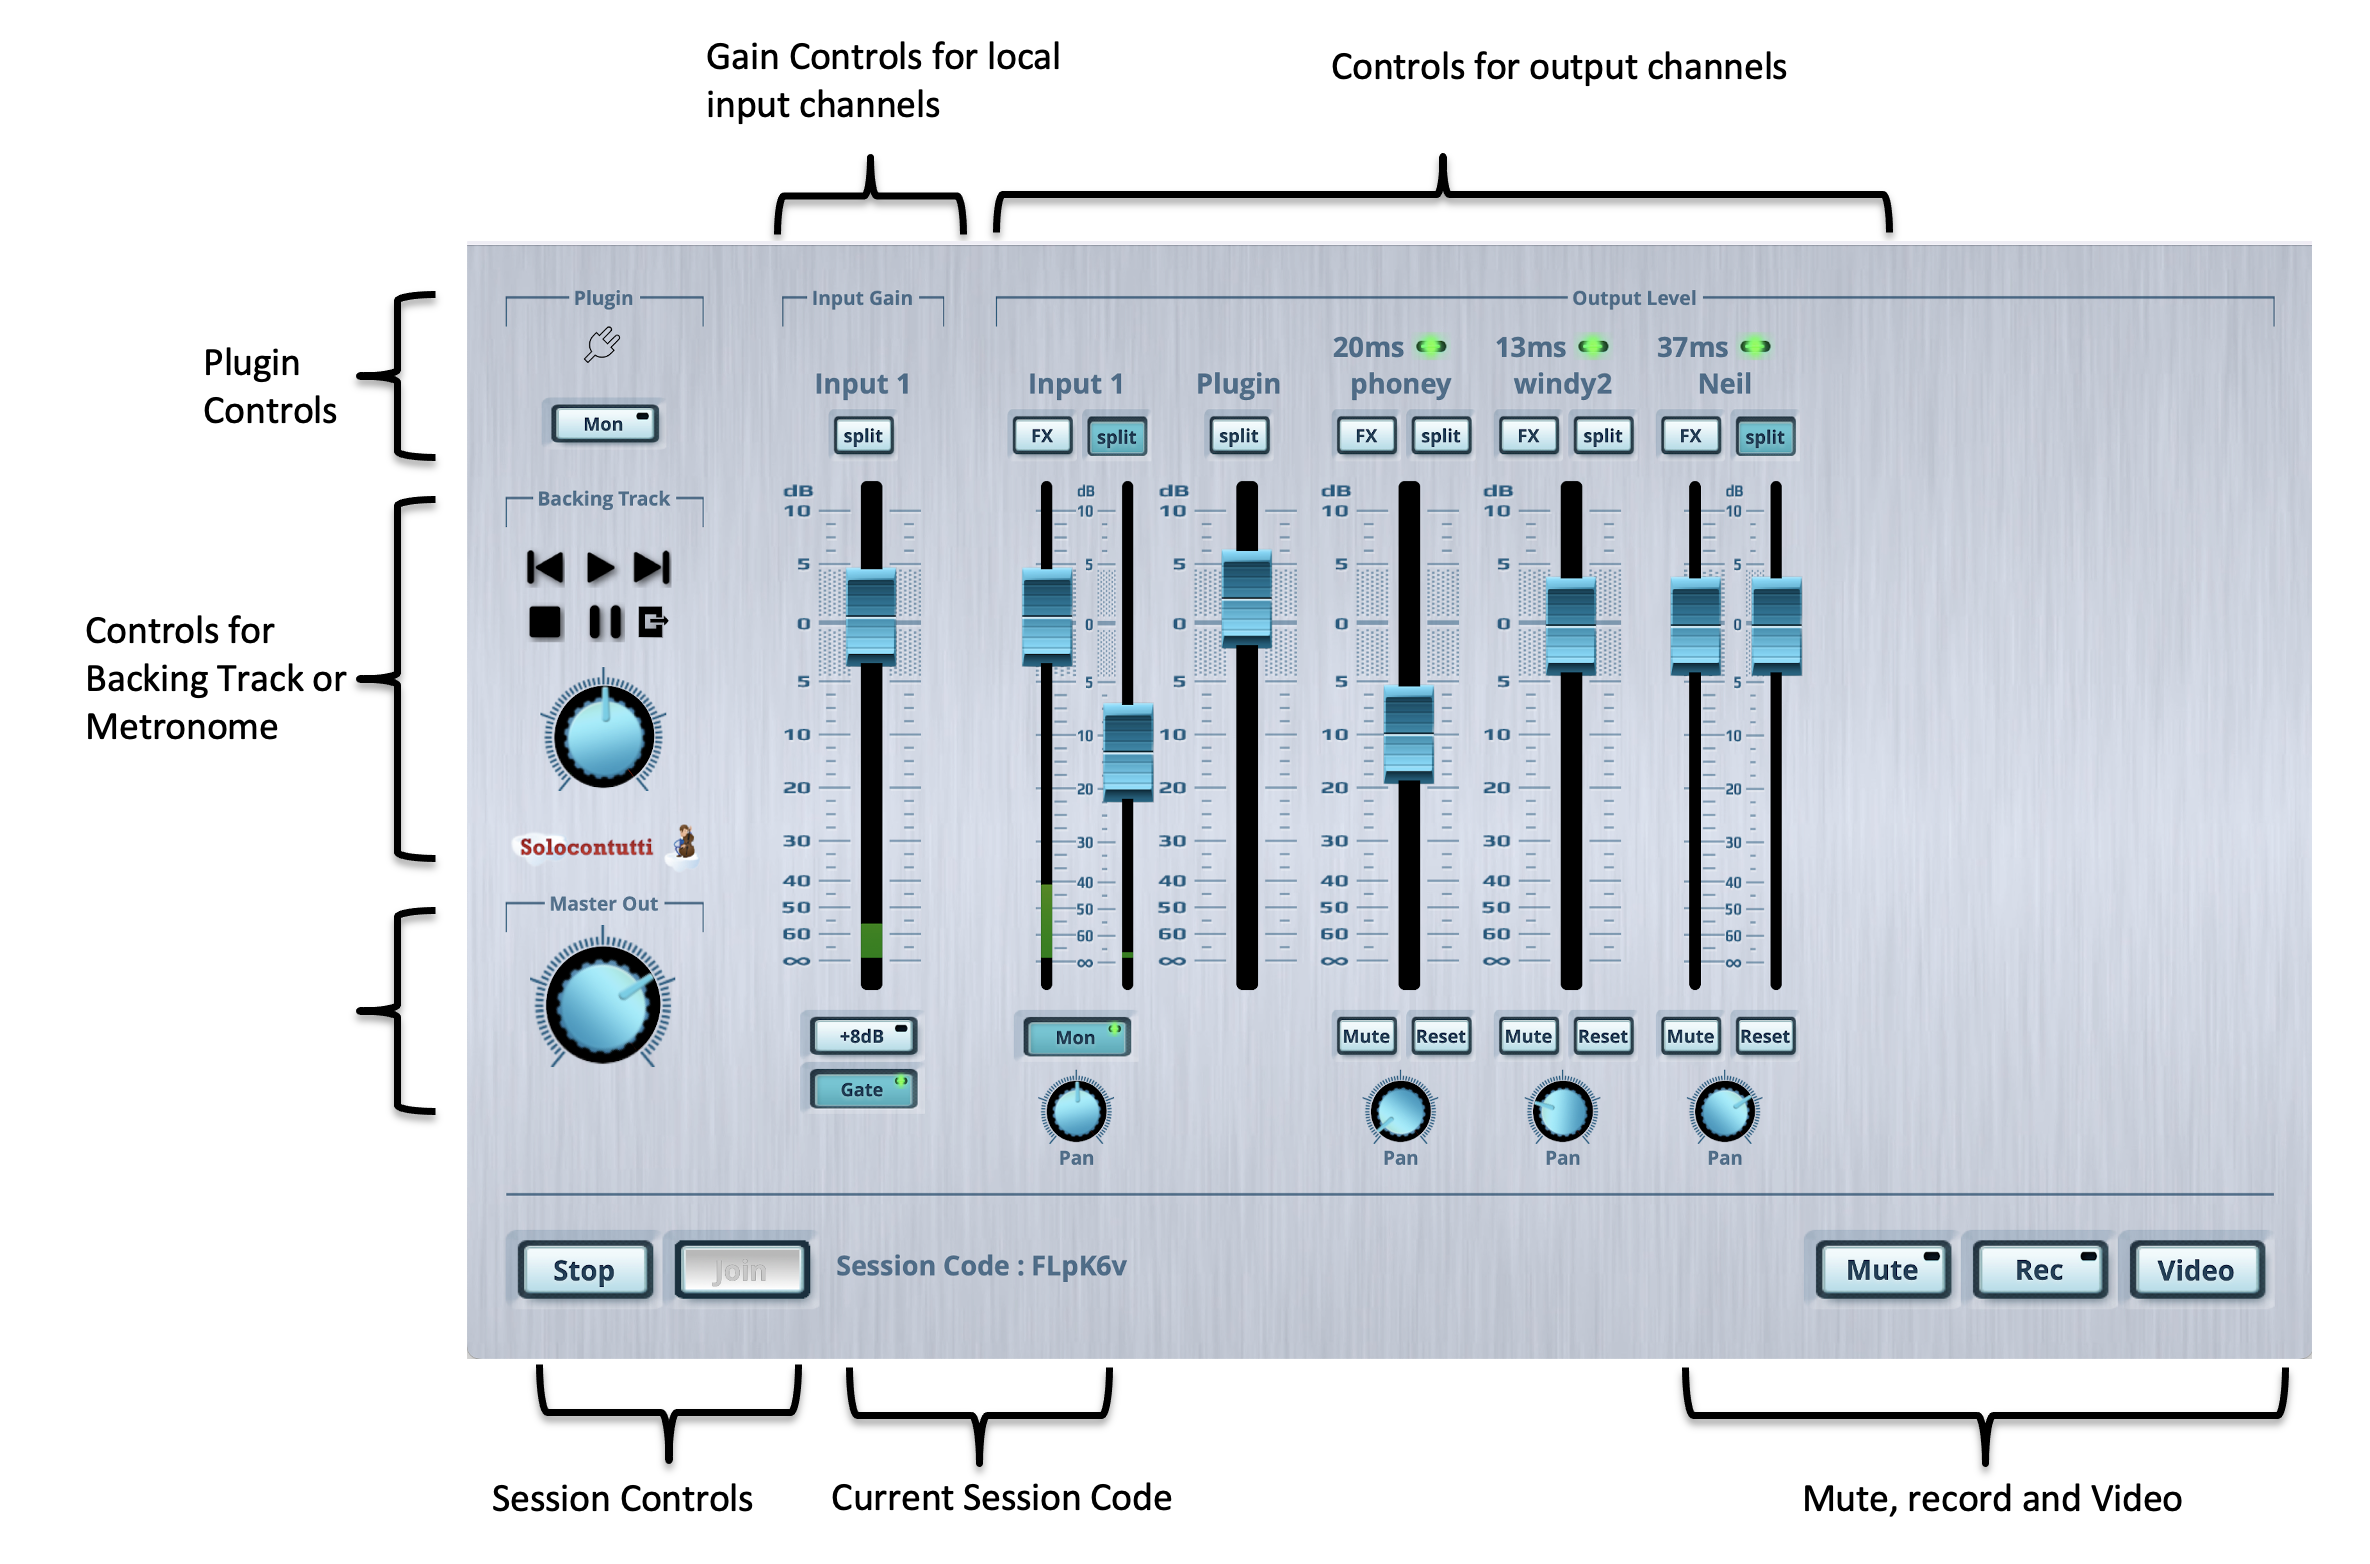
The main window of Solocontutti consists of a number of elements allowing you to control the most important elements of the app.
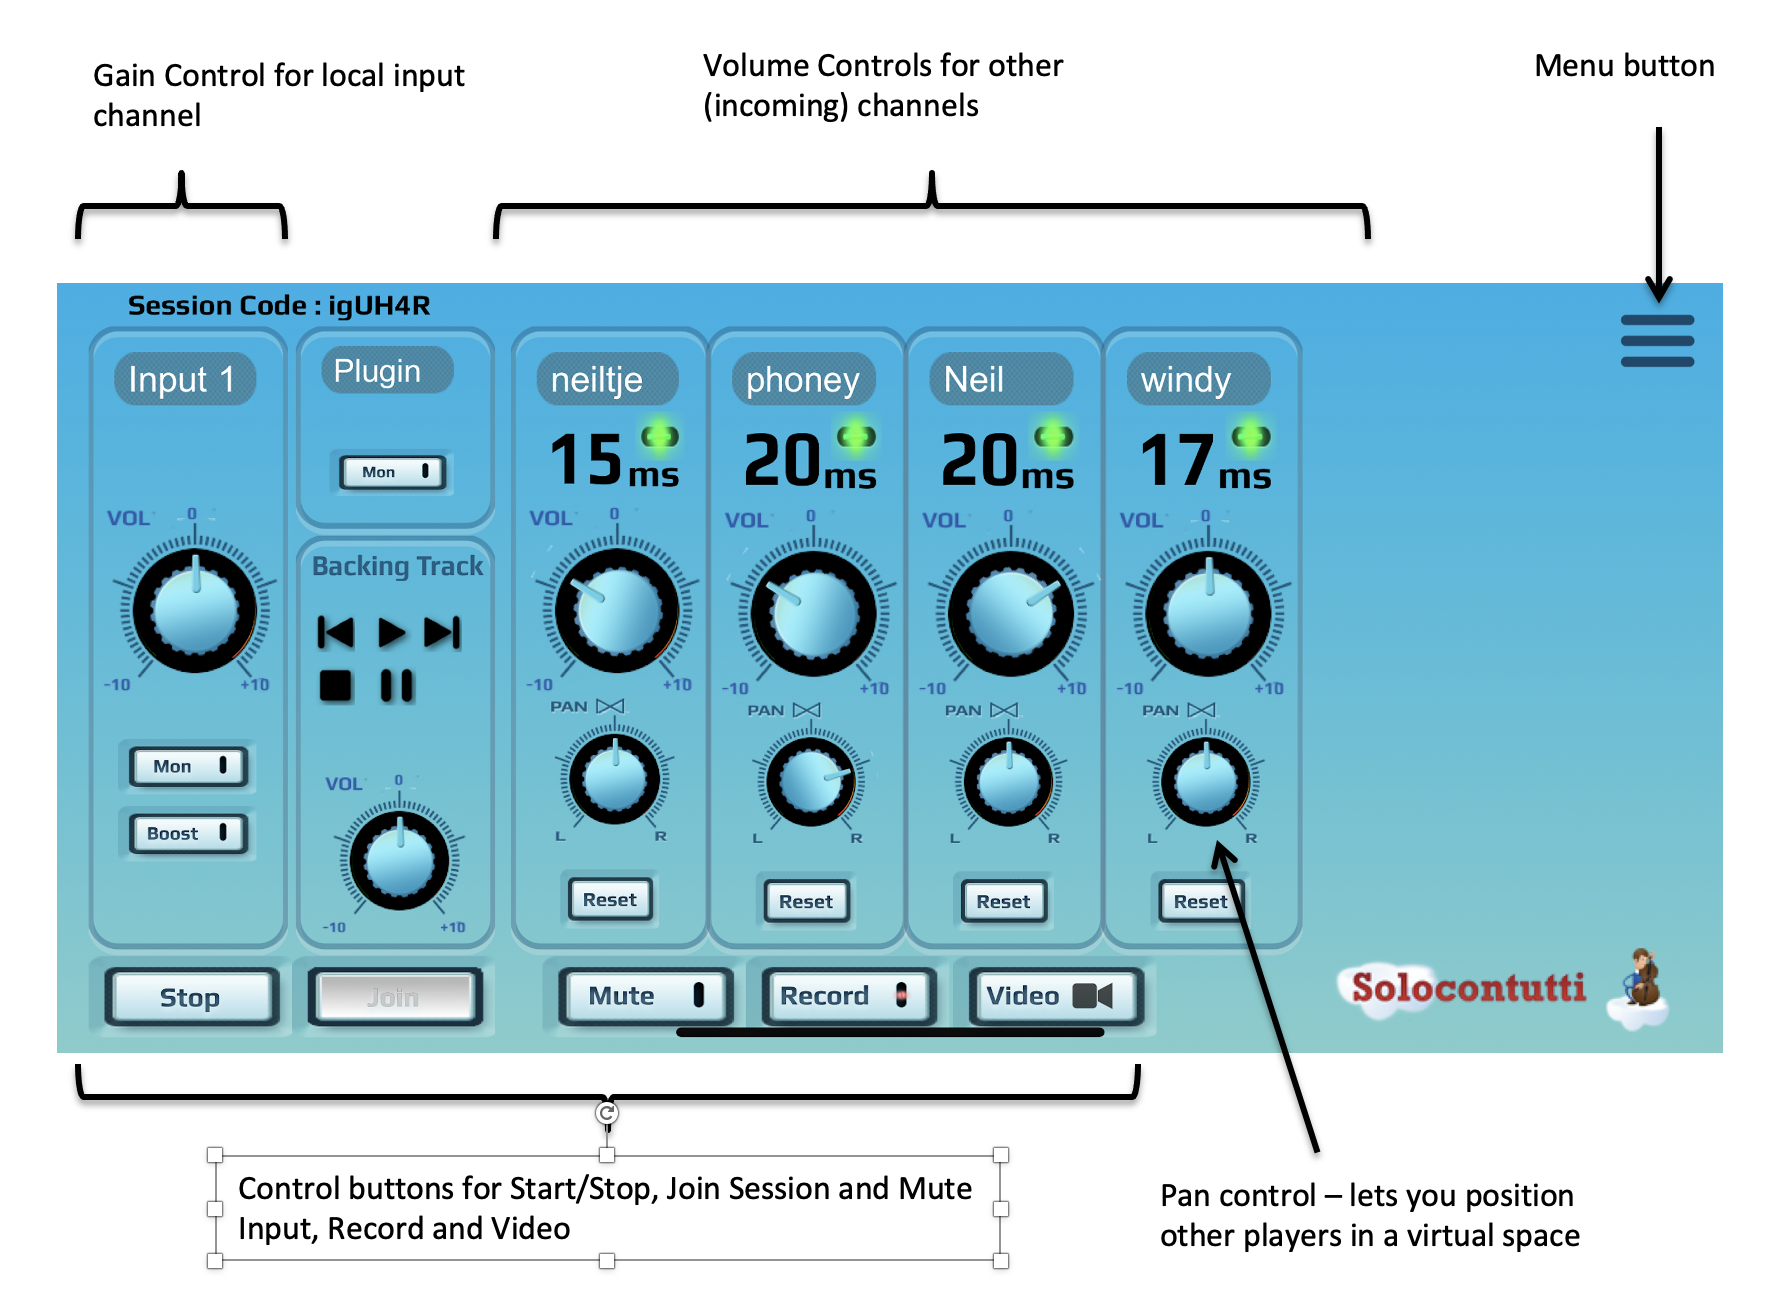
When a session is active the session code is displayed in the centre of the bottom row. You can cut and paste this code to pass it on to other users. When you start a session your code is automatically put into the paste buffer so that you can directly paste it into a message.
Layout for tablets and PCs
Layout for phones
Note that if you do not select "Full" in the view options, then not all of the elements will be shown. Also the available elements are dependent on your subscription tier. The elements of the panel are
- Volume controls for local input channels - this is a set of controls for all of your inputs. Each control deals with a single stereo or mono channel or other input. These controls all affect the way that others in the session hear you inputs. If there are to many input controls to fit in the panel, then a scroll bar appears to allow you to scroll left and right.
- Volume controls for output channels - this is a set of controls for all of your outputs. Each control deals with a single stereo channel (mono outputs are not allowed). There are two type of output - My Input and other players. The "My Input" controls the way that you hear all of your own inputs and allows you to adjust your local sound without affecting what others hear. The other outputs are the streams that you receive from other players. None of these controls affect what other players hear
- Bottom row buttons, incuding sessionn controls, mute, record and video.
Bottom Row Buttons
Bottom Row Buttons
On the bottom row of the main screen is a number of buttons with important functions. Depending on the tier of your subscription, you will see different options
- Start this button will start a new session. When you press this button you will receive a code consisting of 6 letters and numbers. You can send this session code to other players so that they can join you in the session. When you press the button again you will leave the session. You can always re-enter the session by using the join function with the session code.
- Join press this button to join a session for which you have a session code. You will be asked to enter the session code and then you can begin playing.
- Mute this button allows you to mute and unmute all input channels, without changing the gain settings. When the mute is active the green light in the button will light up.
- Record Press the button to start recording, press the button again to stop recording. The
recording will be stored in the standard Solocontutti directory. This is initially your system's music
directory but can be modified in the settings. When you recording tracks from other players they will receive a
warning that you are recording them.
Not all recording modes are available for all subscription types. For details see "Pricing". There are three recording modes which can be selected by clicking in the arrow on the button:
- Record all stereo - the whole session is recorded in one file. This means that your local session will be recorded at best available quality and the other participants at the quality as heard, depending on compression, line quality and latency. Note that all of your own inputs will be included, even if you are not monitoring them
- Record Mixed Inputs Stereo - only your own inputs will be recorded in best possible quality in stereo, which is good as your own setup is. After the live session, participants can share their solo recordings to be mixed into a high quality recording. The recording will include all of your inputs, even if you are not monitoring them.
- Record Raw Inputs Multichannel - all input channels will be recorded. Each channel will be recorded as a separate channel in the .wav file. The recording contains the raw input without application of effects and gain.
- Record All Multichannel - the same as Record Raw Inputs, but also the incoming channels of the other players will each be recorded as left and right channels.
- Video this button allows you to start a video session with the first player in the list. Pressing the button again will stop the session. You can also stop the session by clicking the "exit" button in the video frame, or by closing a floating video window.
MixerControls
Mixer controls
The following is the description of a single mixer control. The functions available depend on (a) what type of channel it is (b) whether you have selected the "Full" view option and (c) the subscription tier. Note that on an iPhone the mixer sliders are replaced by rotary knobs with embedded volume indicators.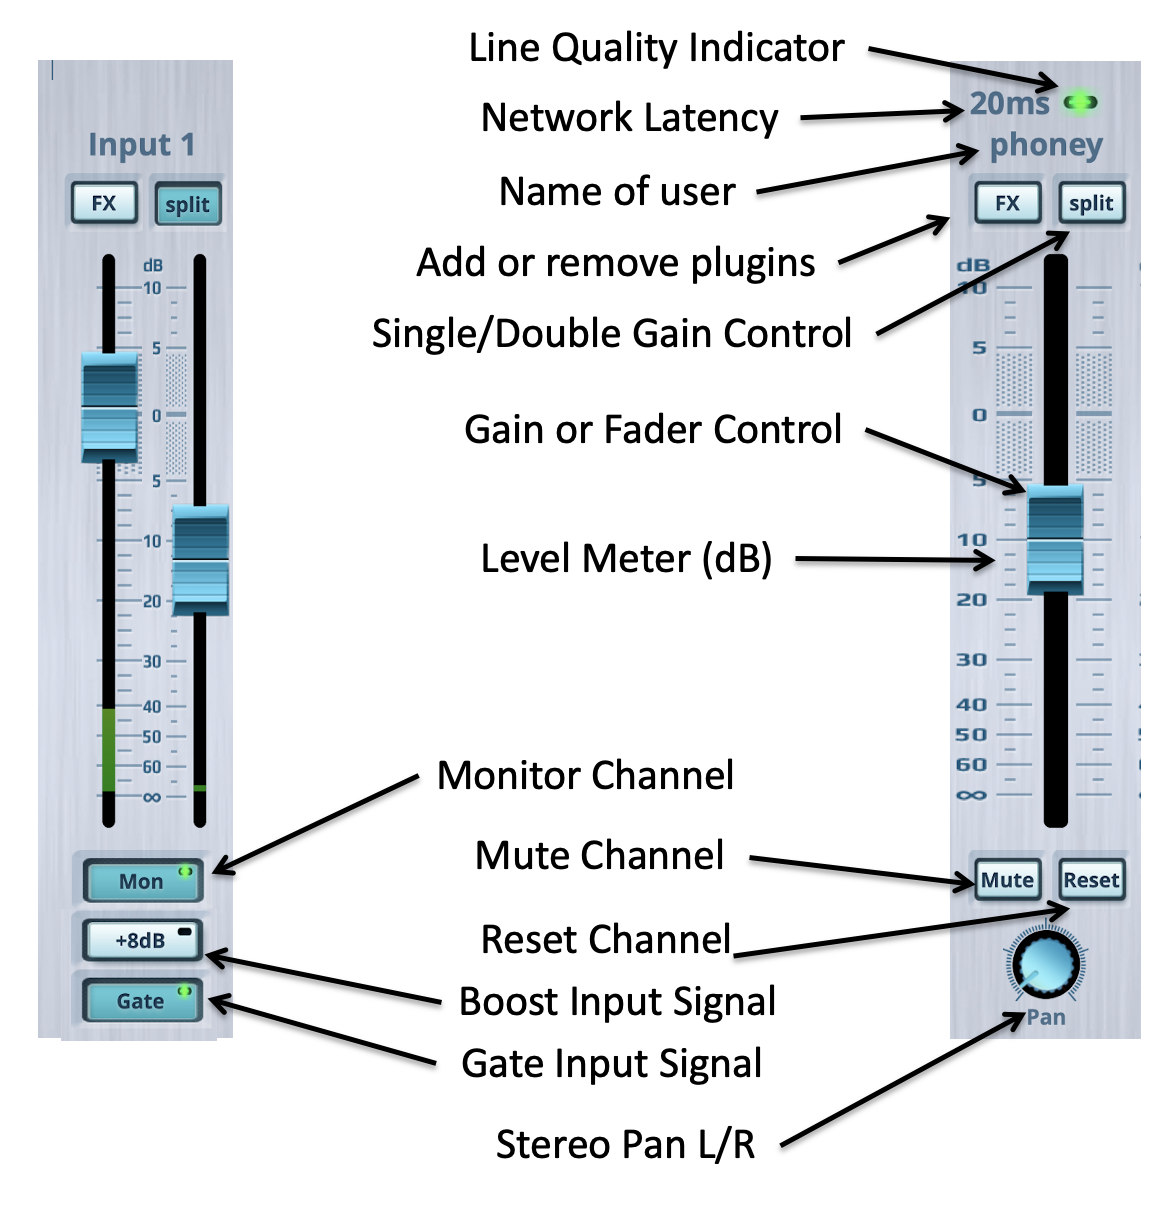
- Player or Channel Name - the name of the user on this channel, or the name of the channel (eg Chan. 1, Backing etc.)
- Level Meter - the sound level on this channel. If it is stereo then you will see a left and right level, for a mono channel you will just see a mono level
- Volume Control - this controls the volume on a particular channel. If it is a stereo channel it controls the volume of both left and right. For output controls you can split this into separate sliders for left and right.
- Pan - this controls how the channel is placed in the stereo field. If the slider is on the left then you will only hear the channel more ro the left, and on the right more to the right. This allows you to virtually position channels in the stereo field to give a spatial illusion.
- Reverb - this allows you to add a simple reverb effect to the channel. If you want a more sophisticated reverb, set this to zero and add a reverb plugin with the "FX" button.
- Boost - this will boost the volume of the channel. This is useful if you have weak input signals that cannot be made loud enough with the volume control. You can adjust the boost level by clicking on the arrow on the button.
- Mon - when this is on, your input channel will be passed on to your output and you
can monitor the sound through the headphones. This is by default on.
!!!!! WARNING!!!!! !!!!!WARNING!!!!! !!!!! !!!!!WARNING!!!!!
Some electronic musical instruments (for example the Yamaha GranTouch GT1) can feed the monitor output back to the program and, if the output volume is high, this leads to a continuous increase in volume which may lead to damage to equipment or possibly even hearing damage. Before using the monitor function you must always ensure this is not the case by (a) ensuring that the output volume is low and (b) trying different volume levels with headphones off.
- Line Quality Indicator - for other players the Line Quality
Indicator tells you what the status is of
the connection with each channel, shown by colours. The colours mean:
- Green - connection is good and data is being received
- Yellow - data is coming through but the network latency is too high. If this is consistent you may not be able to play together with this person without experiencing unacceptable latency
- Red - connection is not working. This may be temporary as for example the other player has gone off line to modify settings, or it may indicate a serious network problem
- Gray - channel is not active
- Latency - this shows the latency in milliseconds between you and this player. The value is the sum of the latency over the network plus the extra buffering that Solocontutti needs to do to retain the desired quality. This may vary quite a lot according to network conditions. Note: this is the combined buffering, device and network latency. You can see a real time display of the individual items by clicking on the latency display.
- Reset - this will reset the network connection and the sound buffer for this connection
- Mute - mute this channel for your own output
- FX - add effects plugins to the channel. See "adding effects" below for more detail.
- Stream - when on this channel will be streamed to the other players, when off it will only be local.
- Split - split a stereo channel into two separate mono channels
Metronome
Metronome
The metronome allows a user to start a metronome running which all users will hear simultaneously, even if they have very different latencies. The metronome is primarily useful in cases where the latency is higher than desirable and it is not easy to keep in time. In this case the metronome can be used to help keep in time. Note that the metronome will be heard by all members of an ensemble, but is not included in any recording.
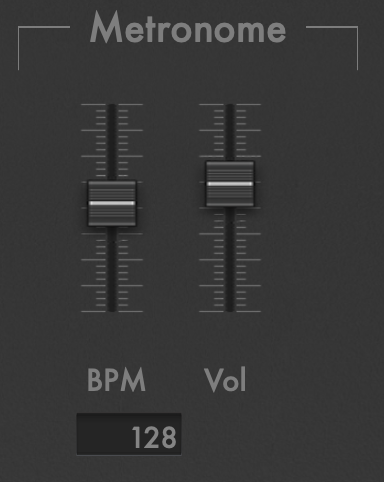
- Volume control - this controls the volume of the metronome sound on the local machine.
- Mute - Mute or unmute the metronome sound
- Metronome rate - rate of metronome in beats per minute. Any user can change this at any time and all metronomes in the ensemble will be synchronised to match. When set to 0 the metronome will stop. The slider controls the local volume, so if you don't want to hear the metronome, just set the volume to 0.
Backing Track
Backing Track
These controls allow you to add a backing track channel to the mix.
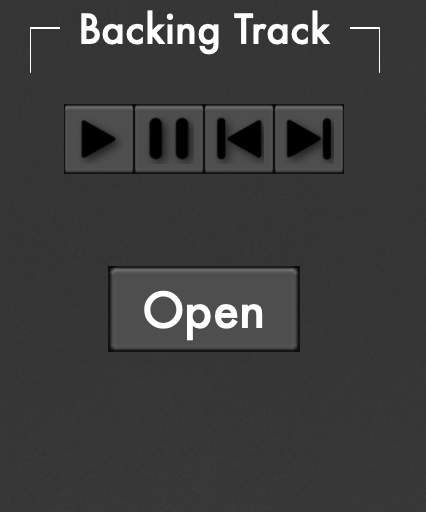
- Transport Buttons - the transport buttons allow you to stop, start, pause, fast forward and fast reverse the track.
- Open - this button will call up a file chooser menu to choose which file you want to play as a backing track. You can use most formats supported by your computer. This is the same as the menu "Backing Track" function. The track will loop until you stop it.
Jam Sessions
Jam Sessions
Jam sessions are currently disabled until we have fixed some security issues
Jam Sessions are Solocontutti sessions that are publicly viewable and anyone can join or create a jam session. The "Jam" menu option allows you to see a list of available jam sessions and by clicking on the row you will see more details and be given the opportunity to join the session.
The jam session will also list an estimated distance to the creator of the sesssion and is intended as an estimate for the amount of network delay (latency) you will experience. In areas with reliable broadband you can get good results at distances up to 500km, depending on local conditions.
You also have the option to create a new jam session and you are asked to fill in a name and a description. The description is particularly important as it tells the prospective jammer what type of session it is, what type of instruments you are using and what levels of technical proficiency you expect.
Other Functions
This section describes other function which allow you to modify settings and test the app.
Preferences
Settings or Preferences
Settings (or preferences on some devices) allow you to modify the way that Solocontutti works and stores data.
Sound Settings
Sound Settings
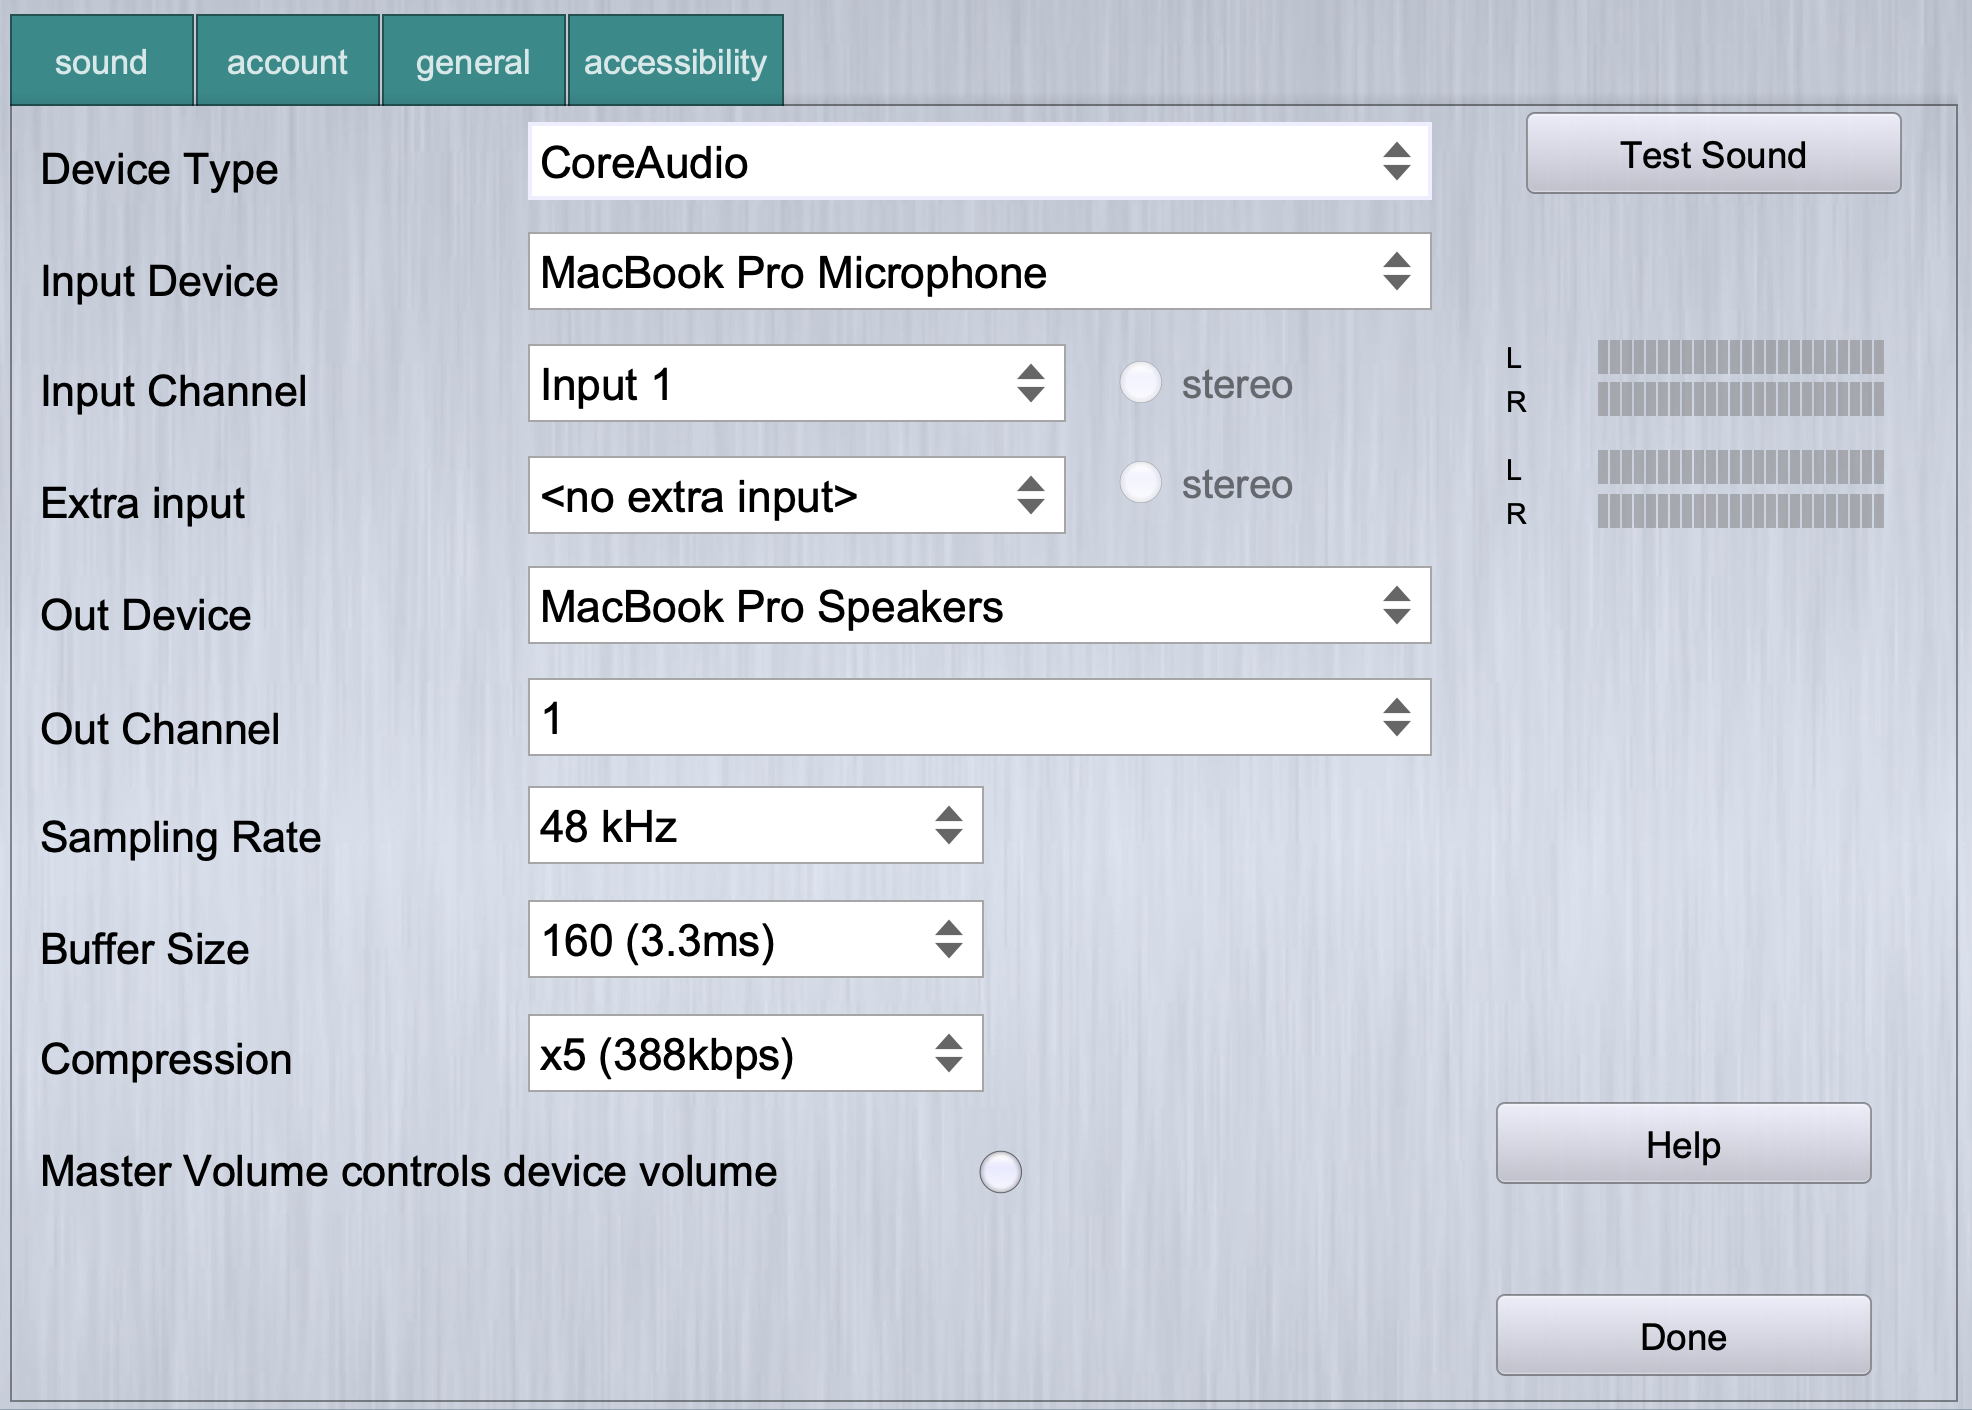
- Device Type - type of device you are using. On Windows this could be ASIO, Windows Audio or Direct Sound. For MacOS there is usually only CoreAudio and for iOS and Android this cannot be chosen
- Input Device - input device for use with Solocontutti app. If you are using ASIO4ALL for multiple devices you should choose ASIO4All here.
- Input Channels - select which input channels you want to use. You can select as many input channels as you want. If there are too many channels to fit in the panel, then a scrollbar will appear which allows you to scroll through the channels. All channels are mono, but you can pair adjacent channels to stereo channels on the main screen
- Output Channels - select which output channels you want to use. Since output is always stereo, you must select exactly two channels. f there are too many channels to fit in the panel, then a scrollbar will appear which allows you to scroll through the channels.
- Sampling Rate - choose a sampling rate for your device from the list of available sampling rates. Solocontutti works best at 48KHz and if at all possible you should leave the sampling rate set to this value.
- Buffer Size - this allows you to select a value for the buffer/frame size used by the sound encoder/decoder (codec) on your computer. Note that very small frame sizes may overload your computer but larger frame sizes produce greater latency. The frame size is the frame size used internally to encode data to send on Internet. The driver frame size may be different from this value, as not all frame sizes are allowed for the encoder, and sound cards do not always support all possible frame sizes. In most cases the difference is small and will have no effect on the operation, other than a slight additional latency. However in some cases, such as the Phonic Firefly sound device, the frame size of the driver cannot be adjusted by the program and there may be a large difference between codec framesize and driver frame size. In this case you also need to open the control panel of the sound card and adjust the frame size to be as close as possible to the encoder frame size.
- Compression - this determines level of compression used to send data - the more compressed the data is the less internet bandwidth required. However, the higher the compression the lower quality. Also with small frame sizes there is more overhead required per buffer. You can see this by changing the frame size and watching how the kbps changes in the compression value. Note that the "uncompressed" value is completely uncompresed and requires a large bandwidth.
- Master Volume controls device volume - When this is set the master volume control will try and control the master volume for the current device. Note that this will not always work as not all devices allow the master volume to be controlled by software. When not set the control acts as an extra final attenuation to the output signal.
- Test Button - this will attempt to play a tone to test if your device settings are working
- Help Button - this will take you to the manual in your browser
- Panel Button - The driver provided with your sound card or ASIO4ALL may have its own settings control, which you may want to access. This button allows you to access these settings directly from Solocontutti app. Note that not all sound cards provide well-behaved drivers that support this function, and you may need to start up your drivers control panel to change settings. If there is no control panel this button will not be visible
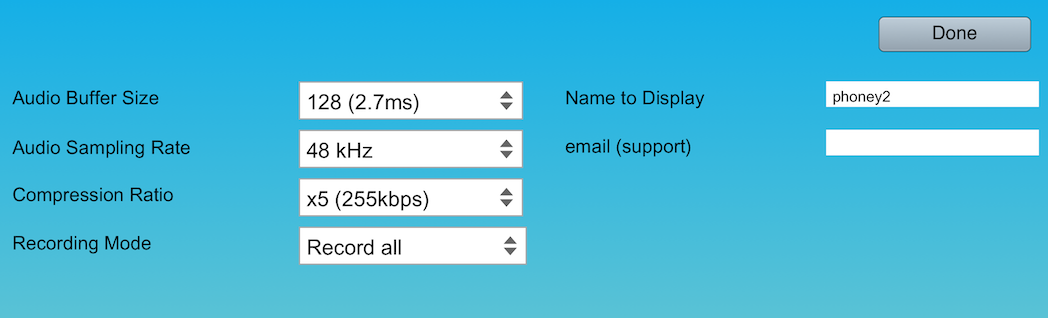
On iPhones the preferences are all on a single page and not all options are available.
Account Settings
Account Settings
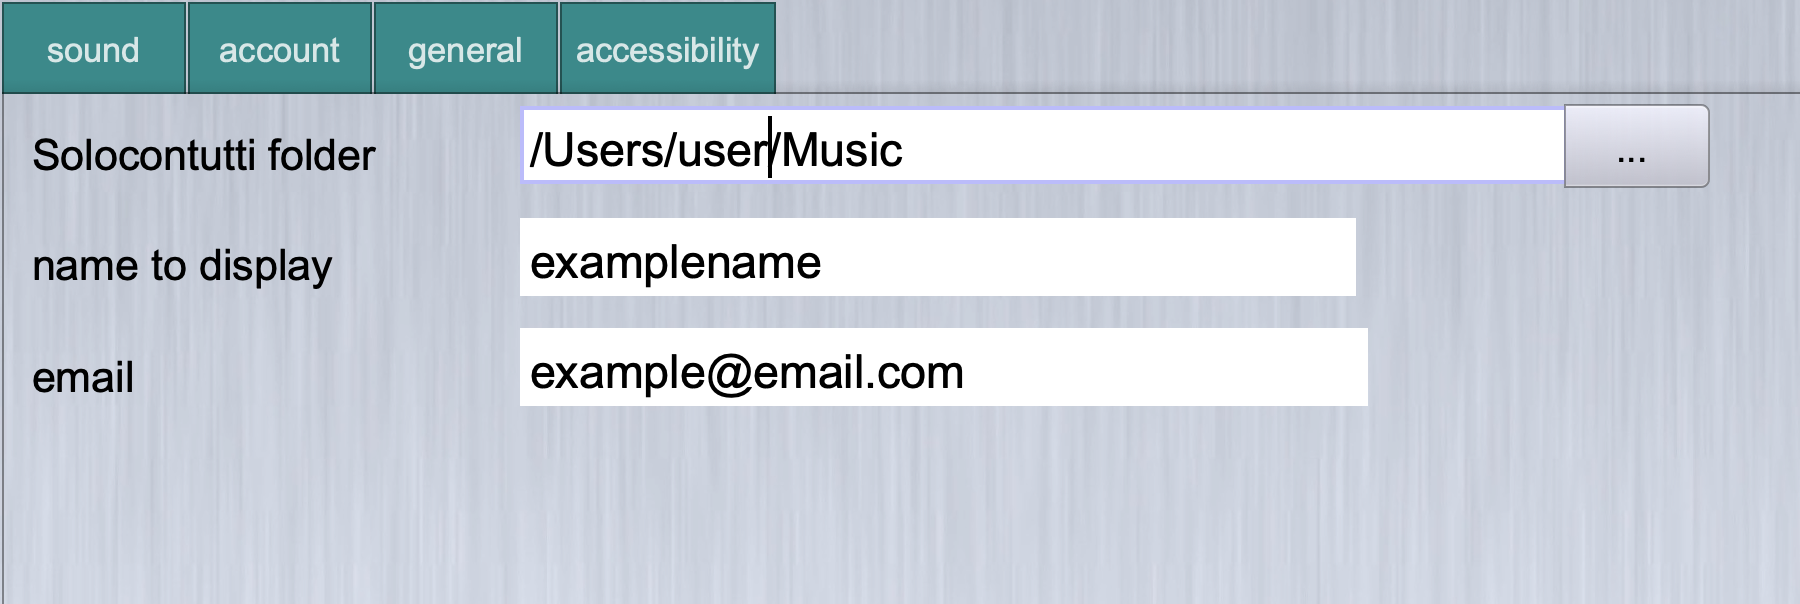
- Solocontutti Folder - allows you to enter a folder where Solocontutti app will store its files such as sound recording and logging files.
- Name to display - this is the name that will be displayed to other users when they see you in a session.
- email - this is your email address which wich only be used to contact you if you upload a diagnostic report
Accesibility Settings
Accesibility Settings
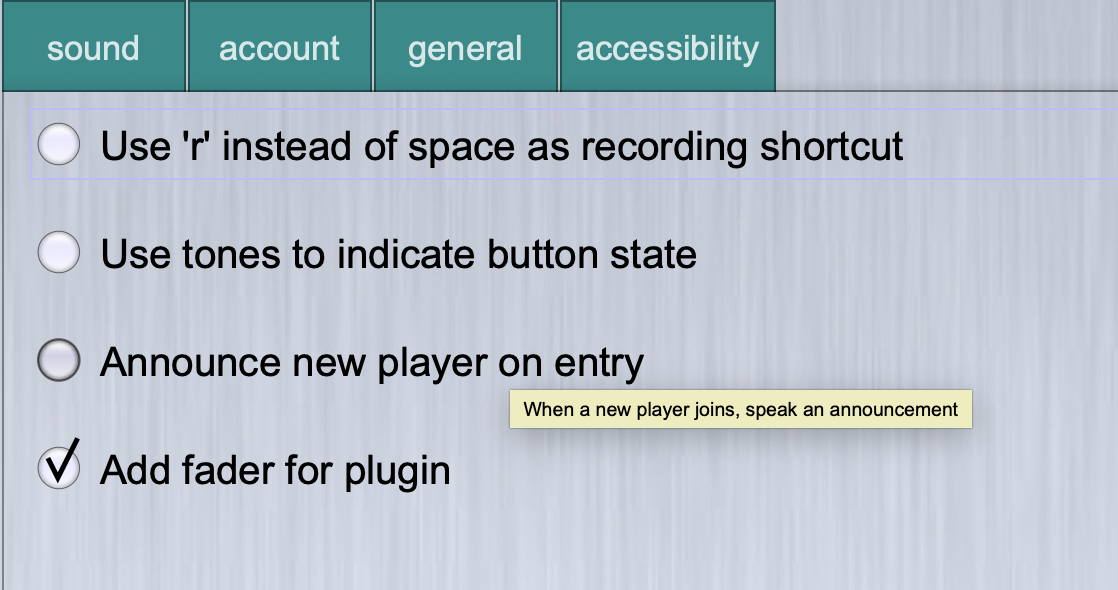
- Use 'r' instead of space a recording shortcut - Solocontutti uses the space bar as a record control, but this conflicts with some screen readers. This allows you to change the recoding shortcut to 'r'.
- Use tones to indicate button state - when set, the clicking a toggle button will cause a rising or falling to to be played indicating that the button is on or off.
- Announce new player on entry - When set the system will announce verbally when a new player joins the session.
Reflect Test
Reflect Test (not available on mobile devices)
The reflect test allows you to test the working of your sound and network settings without creating a session. It works by sending all your sound data to the server, which reflects it back to you where you can hear it through your headphones. This tests the audio and networking parts of the app at the same time.
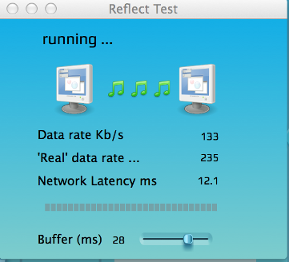
- Data Rate - the bandwidth being used by the Solocontutti sound data being sent to the server in kilobytes/s
- 'Real Data Rate' - the total real bandwidth being used for communication including all network overhead. You will notice that this is much larger than the data rate for small frame sizes.
- Network Latency - the average time taken between data being sent and the reflection being received back. This is the round trip delay, or twice the peer to peer delay. Generally a value below 30ms is considered good.
- Buffer Size - this slider controls the buffer size in milliseconds (1/1000 of a second) being used to store data. A greater buffer size improves quality but also increases latency. Solocontutti uses a standard buffer which is 2x the frame length, so for a 128 sample frame the default buffer will be 5.4ms long.
 Facebook
 Twitter
 Youtube